 This is what I was trying to print the other night when I got the mass of twine instead. This, friends & neighbors, is the corner piece of my 3d printed computer case. The top is going to rest on those little pegs and after I clean up the pieces, they will all snap together like a puzzle. I was hoping to make it large enough for a Micro ATX motherboard, but that's not going to happen with this build. Instead, it's going to be Mini ITX. It will still have more than enough horsepower to run a Makerbot.

Monday, September 26, 2011
Much better.
This is what I was trying to print the other night when I got the mass of twine instead. This, friends & neighbors, is the corner piece of my 3d printed computer case. The top is going to rest on those little pegs and after I clean up the pieces, they will all snap together like a puzzle. I was hoping to make it large enough for a Micro ATX motherboard, but that's not going to happen with this build. Instead, it's going to be Mini ITX. It will still have more than enough horsepower to run a Makerbot.
Sunday, September 25, 2011
Sometimes you get the bear, sometimes the bear gets you.
 3D printing is a wonderful hobby. It is extremely satisfying to create something in your mind, express it via Sketchup or Meshlab or Autocad and then print it into reality via a Makerbot. That being said, it's not all peaches and cream. I'm working on designing and printing a custom computer case. Because the pieces are large, relatively speaking, most of them will take more than 5 hours each to print. Time is kind of the enemy when it comes to 3d printing. Anything 3 hours or less, I'm fairly comfortable that it will finish successfully. A 5 hour print, on the other hand is essentially a dice roll only helped by printing from the SD card after oiling and re-calibrating your bot. I didn't do any of those things and I ended up with this expensive ball of twine.
Wednesday, September 21, 2011
Saturday, September 17, 2011
Walk before you run
So lately I have been working with the calipers to get better at sizing objects. I had seen in a tutorial about Makerbot designs and Sketchup to size up your model by 1000, then downsize it in Skeinforge by .001 I spent alot of time with this method, all to not much success. My mind wanders when I design, and at times I forget to size it times 1000.
So I went to a way that works for me. Size it right in Google Sketchup to start. Zooming in and navigation around a 3D model in Sketchup can be tricky when working with objects no larger then 100mm by 100mm, but it has allowed me to leap forward with some scaled design.
I issued myself a challenge. Make a box to fit perfectly around an object natively in Google Sketchup. I found the simplest item I could laying around. It was a square bubble level. I then used the calipers to take measurements, and translated this data into Sketchup. I then worked in some wall thickness, and was able to produce a case that would perfectly fit the object. No sizing needed in Skeinforge or ReplicatorG. Just import it, center it, and run it.
This opens some new stuff for me now that I have gotten the hang of modeling proper size in Sketchup, rather then modeling based upon reference of other lines in the model itself. The below picture doesn't look like much, but the case perfectly fits this bubble level.
Now maybe I can put some sort of mount on it, and strap it to my HBP, and no longer will be the days of eyeballing my platform levelness.


Thursday, September 15, 2011
Makerbot Breaking News!
Seems those in NY at Makerbot Headquarters have been working long and hard. Today it was announced that a new MK7 extruder head is now available. Looking at some of the photos, it looks like dual extruders is now on the horizon. My imagination runs wild when I think of where will 3D printing be for the average person a year from now.

Tuesday, September 13, 2011
Fly box
Fly box compartments complete. I am learning how to properly size objects in Google Sketchup at the moment. Previously I was just making things and sizing them in relation to the object on the screen. Now I am actually breaking out the calipers to visualize an object, draw on paper, and using calipers to dial some things in. Once the box top is complete I will share the project on Thingiverse. Then it is onto my next project which will take me a while.

Monday, September 12, 2011
7 Hour Vase Print
I was looking for something new to display on the desk. I also wanted to play around with blending colors while a print is running. Not bad for my first try.

Sunday, September 11, 2011
Cigar ashtray.

I put this up earlier on Thingiverse. The standard disclaimers apply regarding ABS plastic. Specifically, do as I say and not as I do. Don't use these as real ashtrays. I'm going to break one of them in tonight.
Saturday, September 10, 2011
The most useful thing on Thingiverse.

 What's the most useful thing on Thingiverse? IMHO, it has to be Makealot's Spiral Cup. I've probably made a hundred of these things. My daughter gave them away to practically every kid in her class and I have them all over my house and at my office at work. It's the perfect size to stick stuff in and it's a beautiful object as well. A 3d print does not have to be complicated to be useful. If I have idle time for my Makerbots, I can always print Spiral Cups. They won't go to waste.
Thursday, September 8, 2011
Vase & Ashtray.

 My daughter wants me to make a plastic flower for the vase. Also, making ashtrays out of ABS is not for anyone else but me. ABS is flammable. It will catch on fire if you are not careful, so don't do it.
Broken Wires... Failed Builds...Life of a botter....
Not much to report as of late. I have been working the 3D printer about 6 hours a day. Using it quit a bit means wires pull loose, screws need tightened, and rods need oiled. No major issues, just some maintenance. I am having problems with my Google Sketchup designs at the moment. Looks great in Sketchup, but when printed...Houston we have a problem. Looking into my design issues at the moment.


Tuesday, September 6, 2011
Pink Panther Lady complete
I hope you had a nice Labor Day weekend. The Makerbot was fired up and didn't take the weekend off. A mix of different projects started and a few completed. Most notably was the "Pink Panther Lady" that is available on Thingiverse. I thought I would give it a go and see how the statue turned out. I was pleasantly surprised.

Monday, September 5, 2011
At it again.
 I had a need for a small, yet sturdy container for my RSA tokens. Then I remembered I had a couple of 3d printers that weren't really doing much today. I designed this sturdy small box for tiny objects in Sketchup, printed it & posted it on Thingiverse.
My RSA tokens will never float around my briefcase again.
Injection molding machine.
I have discovered on eBay that I can buy an injection molding machine for less than $5k. Hmmm.
Saturday, September 3, 2011
Pulley mount.
I know that I'm posting a lot, probably too much. But I'm sure the volume will drop off eventually. This piece is pretty esoteric, all things considered. You have to have something you need to mount to make use of it. I want to play with pulleys and block and tackle, so this will help me do that. This is the whole point of these machines. You can think of something, design it and turn it into reality. Sure a lot of things like woodworking and metalworking give you similar powers, but those things are difficult and time consuming. Once you get the hang of your Makerbot, designing and printing stuff becomes much faster than any other type of fabricating process. This is why I love it so!

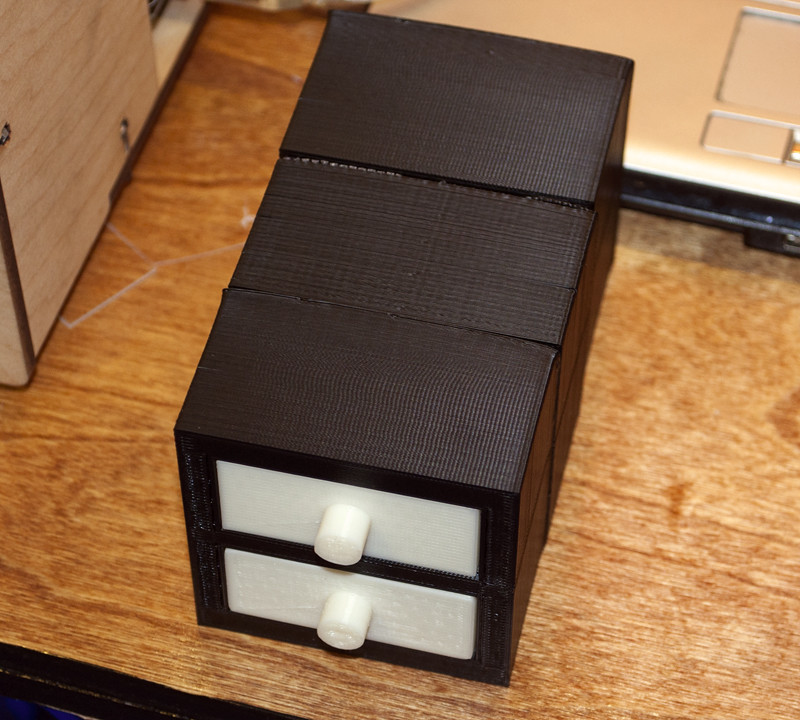
Finally posted the chest of drawers on Thingiverse.

It turned out ok. If I were designing it again, I would do things differently. But I've already lost interest. It is going to work well for my Allen keys though.
Friday, September 2, 2011
Gave the 'bots the night off.
Normally, I run at least 3 builds a day for both of them. Tonight, I wasn't sure what project I wanted to focus on. I could try to fix my chest of drawers or I could start printing that cool candelabra (or I could start playing Deus Ex). So I took the night off, had a cigar and figured I would have plenty of time on this long weekend to refocus my efforts.
I was telling Ben that I have a Mendel kit that I picked up back in January that I still haven't built yet. I should start that this weekend too. Also, I have cut wood, motors & instructions for a full size CNC and that's just sitting there too. I really ought to get my act together this weekend.

The force is not with me...
Figured I would give this Yoda Mini a shot from Thiniverse. My PC must hate me. about 50% through the print, my PC decides to no longer like the COM port that the TOM is on. Hence the following below. Gasp!

Thursday, September 1, 2011
Raftless Makerbot O' Boy!!!
After some battles with Skeinforge, trying to figure out why my first layer is not adhering to the raft. I have tweeked and fiddled with settings for days. It was time for me to attempt the raftless route. With a HBP, this is the way to go so I am told. There are some adjustments that need to be made both with the Z axis height, as well as some Skeinforge modifiations. Benefits of going raftless are that there is no material to cut away from the bottom of your piece after it has been printed, you save on filament, print times are shortened and..... "Your first layer adheres to the build platform!!"
Bravo to Jetguy on Thingiverse forum for the guidance!


Cleveland Makers Alliance Meeting
http://www.meetup.com/MakersAlliance/events/29844771/
Tuesday, September 6, 2011, 8:00 PM
13613 Detroit Avenue, Lakewood, OH

Tuesday, September 6, 2011, 8:00 PM
13613 Detroit Avenue, Lakewood, OH
Glow in the Dark Filament
I have received a batch of glow in the dark filament. Looking forward to making some sort of prints in the spirit of Halloween. Maybe I will make some glow in the dark accessory for my sons costume this year.

Subscribe to:
Posts (Atom)